
The following diagrams explain each part of the BlackVue dashcam.
Front camera
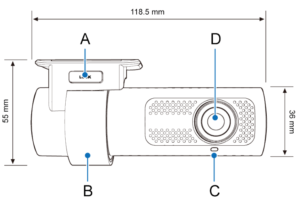
A) Lock button
B) Mounting bracket
C) Front security LED:
 : Lights on during (i) normal mode, (ii) an event is being recorded (impact detected), (iii) manual recording has started, or (iv) motion is detected in parking mode.
 : Blinks slowly during parking mode motion detection standby.
D) Camera lens
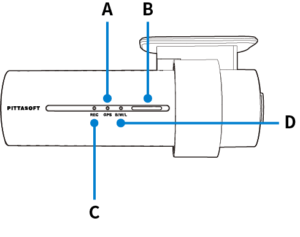
A) GPS LED:
 : Lights blue when GPS is on.
 : Blinks blue quickly when GPS is turning off.
B) Speaker
C) Recording LED:
 : Lights orange in normal mode.
 : Lights red when (i) an event is being recorded (impact detected), or (ii) manual recording has started.
 : Lights green in parking mode when motion is detected.
D) Bluetooth/ Wi-Fi/ LTE LED:
 : Lights yellow when LTE is connected.
: Lights white when Wi-Fi is connected.
 : Blinks yellow slowly when Bluetooth is paired.
 : Blinks yellow quickly when Bluetooth is in pairing mode.

A) Touch Sensor:
Press the sensor to trigger a manual recording.
* Touch sensor can be turned on/off in the firmware settings.
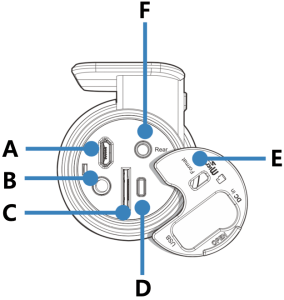
A) Micro USB port
B) DC in (power connector)
C) microSD card slot
D) Format button:
– Press and hold for 5 seconds, and after a beep, release the button. Then, press again and hold for 5 seconds and release the button after a beep to format the microSD card.
E) Cover
F) Rear camera connection port
Removing and inserting the front camera

A) Connectivity details label: Default Wi-Fi SSID / Default Wi-Fi password / Cloud code / QR code
B) Serial number label
• To remove the dashcam from its bracket, press the LOCK button and pull the dashcam out of the mounting bracket.
• To insert the dashcam into its bracket, push the dashcam into the mounting bracket until it “clicks” in.
Rear camera (DR770X-2CH only)
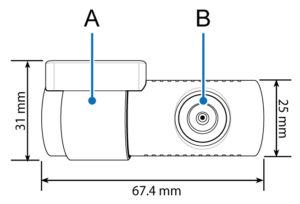
A) Mounting bracket
B) Camera lens
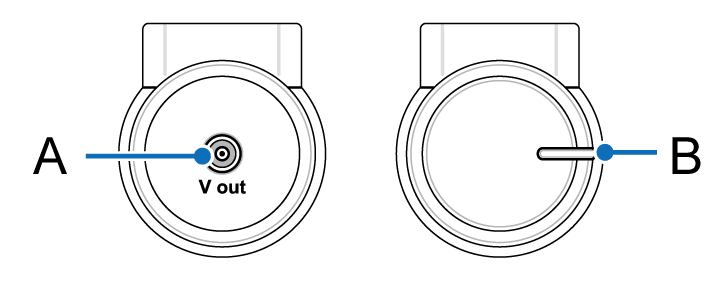
A) V out (Front camera connection port)
B) Rear security LED
: Stays on in all recordings modes but can be turned off from firmware settings.
Removing and inserting the rear camera (DR770X-2CH only)

• To remove the rear camera from its bracket, hold the mounting bracket and pull the rear camera out.
• To insert the rear camera into its bracket, push the rear camera into the mounting bracket until it “clicks” in.


