- BlackVue Dashcam Installation Guide
- Powering Your Dashcam
- DR770X-2CH IR
- DR770X-2CH Truck
- DR770X-2CH DMS
- Model-Specific Preparation
- Step 1. Adjust the DMS Camera Angle
- Step 3. Connect the DMS Camera Cable
- Step 4. Tuck in the DMS Connection Cable
- Step 5. Connect the DMS Camera Power Cable
- Step 6. Tuck in the DMS Hardwiring Power Cable
- Step 7. Plug in the Cigarette Lighter Power Cable
- Step 8. Locate the Vehicle’s Fuse Box
BlackVue Dashcam Installation Guide #
Before You Begin #
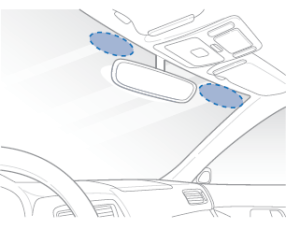
- Choose installation locations carefully:
- Front camera: Behind the rear view mirror.
- Rear camera: At the top center of the rear windshield.
- Clean the windshield: Remove any dust, oil, or moisture before sticking the cameras.
- Peel off the protective film from both front and rear cameras to prevent overheating.
- Do not install the cameras where they might block the driver’s view.
![]() Note
Note
• For DR770X-1CH Series user, the BlackVue rear camera is optional.
Step1. Insert the microSD Card #
- Turn off the vehicle engine.
- Open the microSD card slot cover on the front camera.
- Gently insert the card until it clicks into place and close the cover

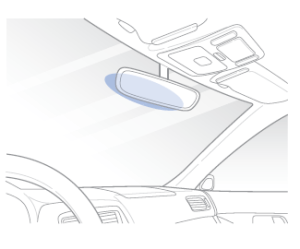
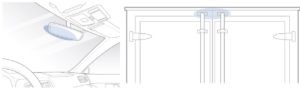
Step2. Mount the Front Camera #
- Remove the double-sided tape.
- Attach the front camera to the windshield, behind the rear view mirror.

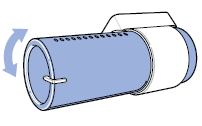
- Adjust the lens angle by rotating the camera body.
💡Tips: Tilt the lens slightly downward (~10°) for a 6:4 road-to-sky ratio.

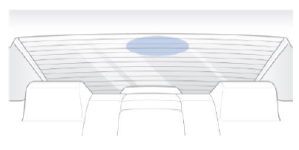
Step3. Mount the Rear Camera (if applicable) #
- Peel off the tape film and stick the rear camera to the rear windshield.
- Rotate the camera body to adjust the viewing angle.
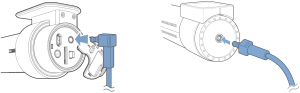
Step4. Connect the Front and Rear Cameras #
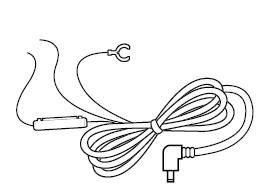
- Use the provided rear camera cable:
- Plug one end into the ‘Rear’ port of the front camera.
- Plug the other into the ‘V out’ port of the rear camera.
Step5. Hide the Rear Camera Cable #
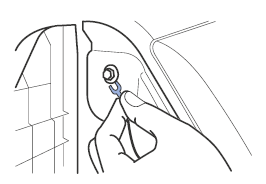
- Use the pry tool to gently lift window moldings or rubber seals.
- Tuck the cable neatly along the edges for a clean look.
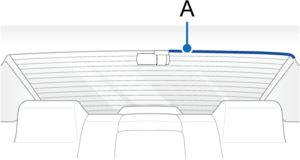
A – Rear camera connection cable
Powering Your Dashcam #
You can power your BlackVue dashcam in three main ways. Choose the option that matches your vehicle’s compatibility.
Option A. Using the USB-C PD 3.0 Power Cable #
Use this method if your vehicle has a Type-C port that supports PD 3.0 (Power Delivery 3.0).

1) Locate the Type-C Port in Your Vehicle
- Usually located near the passenger seat (varies by vehicle).
- Look for a lightning bolt symbol to confirm PD 3.0 support.
2) Connect the Cable to the Dashcam
- Plug the USB-C PD 3.0 Power Cable into the vehicle’s Type-C port, and the other end into the front camera’s DC-in port

3) Hide the Cable
- Use the pry tool to lift rubber seals and tuck in the cable neatly along window trim.

A) Rear camera cable / B) USB-C PD 3.0 Power Cable
4) Start the Engine
- The dashcam will automatically power on and start recording.
⚠️Caution
Parking Mode is not supported with USB-C power.
For full features, use a hardwiring kit or battery pack.
Option B. Using the Dual USB-C Car Charger (Type-C Adapter) #
Use this method if:
- Your vehicle doesn’t have a Type-C port, or
- The Type-C port doesn’t support PD 3.0.
1) Plug the Dual USB-C Car Charger into the 12V Outlet
- Insert the Dual USB-C car charger into your vehicle’s cigarette lighter socket.
- Connect the USB-C power cable to the USB-C port labeled “Dashcam” on the adapter.


2) Connect the USB-C PD 3.0 Power Cable
- Connect the cable from the adapter to the front camera’s DC-in port.
3) Hide the Cable
- Use the pry tool to lift rubber seals and tuck in the cable neatly along window trim.
A – Rear camera cable / B – USB-C PD 3.0 Power Cable
4) Start the Engine
- The camera will power on and begin recording automatically.
⚠️Caution
This method also does not support Parking Mode.
To record in parking mode while the engine is off, please connect the Hardwiring Power Cable or install a Power Magic Battery Pack (sold separately).
Option C: Using the Hardwiring Power Cable #
1) Locate your vehicle’s fuse box (check your car manual if unsure).
2) Remove the fuse box cover and identify:
3) A fuse that powers on with the engine (e.g. audio, cigarette lighter) – connect ACC+ here.
4) A fuse that’s always powered (e.g. hazard lights, dome light) – connect BATT+ here.
💡Tips: For parking mode and battery protection, connect BATT+ to the hazard light fuse.
5) Connect the GND (ground) wire to a metal bolt on the vehicle frame.
6) Plug the power cable into the front camera’s DC in port. The dashcam will power on and start recording.
Option D: Using the Battery (B-130A) #
This installation method involves using a dedicated external battery, the Power Magic Ultra Battery (B-130A), to power the dashcam. It is an effective option that provides stable power to the dashcam without burdening the vehicle’s main battery.
✅ Recommended For
- Users who need extended dashcam recording while parked
- Users who want to prevent battery discharge of the vehicle
- Users looking for a more reliable power source
🔧 Installation Overview #
The B-130A can be charged via the vehicle’s cigarette lighter socket or fuse box, and once fully charged, it supplies power independently to the dashcam.
📘 For detailed installation steps and precautions, please visit the following link:
https://manual.blackvue.com/docs/power-magic-ultra-battery-b-130a/installation/installation-b-130a/
DR770X-2CH IR #
Model-Specific Preparation #
- Choose installation locations carefully:
- Front camera: Behind the rear view mirror.
- Interior/Rear camera : At top of the front or back windshield.
- Clean the windshield: Remove any dust, oil, or moisture before sticking the cameras.
- Peel off the protective film from both front and rear cameras to prevent overheating.
- Do not install the cameras where they might block the driver’s view.
Step 1. Mount the IR Camera #
- Peel off the tape film and stick the rear camera to the rear windshield.
- Rotate the camera body to adjust the viewing angle.

Step 2. Connect the Rear Camera IR Camera #
- Connect the rear camera cable to the ‘Rear’ port on the front camera.
- Connect the other end of the cable to the ‘V out’ port on the IR camera.
Step 3. Route the Power Cable and IR Camera connection Cable #
- Use the pry tool to lift the edge of the windshield trim or molding.
- Tuck the power cable into the gap to conceal it.

A) Interior/rear camera connection cable
B) Power cord
DR770X-2CH Truck #
Model-Specific Preparation #
- Choose installation locations carefully:
- Front camera: Behind the rear view mirror.
- Rear camera : At the top of the back of the vehicle.
- Clean the windshield: Remove any dust, oil, or moisture before sticking the cameras.
- Peel off the protective film from both front and rear cameras to prevent overheating.
- Do not install the cameras where they might block the driver’s view.
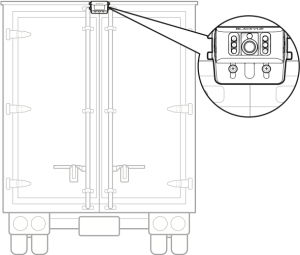
Step 1. Install the Rear Camera Mounting Bracket #
- Fasten the rear camera mounting bracket using the included screws.
- Secure it to the top of the rear exterior surface of the vehicle.
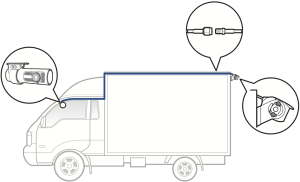
Step 2. Connect the Rear Camera Cable
- Connect the rear camera to the front camera using the provided rear camera cable.
- Plug one end into the ‘Rear’ port of the front camera.
- Plug the other end into the ‘V out’ port of the rear camera.
![]() Note
Note
• If the waterproof coaxial cable is mounted externally, we recommend covering it to secure it in place and protect it against the elements.
DR770X-2CH DMS #
Model-Specific Preparation #
- Choose installation locations carefully:
- Front camera: Behind the rear view mirror.
- DMS camera : On the driver’s dashboard or front windshield.
- Clean the windshield: Remove any dust, oil, or moisture before sticking the cameras.
- Peel off the protective film from both front and rear cameras to prevent overheating.
- Do not install the cameras where they might block the driver’s view.

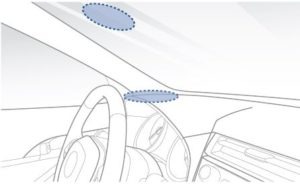
A B
A) Front camera
B) DMS camera
![]() Note
Note
- Recorded videos from DMS are saved to the microSD card on the front dashcam.
- For 750X DMS LTE Plus users, please insert the SIM card following QSG that’s including in the box.
Step 1. Adjust the DMS Camera Angle #
- Rotate the DMS camera body and mounting bracket to adjust the viewing angle.
- Peel off the backing from the double-sided tape.

Step 2. Attach the DMS Camera
- Secure the DMS camera to either the windshield or the dashboard, based on the chosen mounting position.

A B
A) Windshield installation
B) Dashboard installation
![]() Note
Note
- For best accuracy of DMS, install the DMS camera in the recommended area.
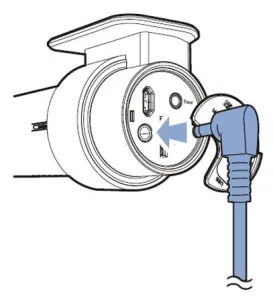
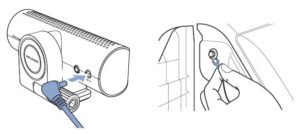
Step 3. Connect the DMS Camera Cable #
- Use the supplied cable to connect the front camera (‘Rear’ port) to the DMS camera (‘V out’ port).

Step 4. Tuck in the DMS Connection Cable #
- Use the pry tool to lift the edge of the window molding or rubber seal.
- Tuck the DMS camera connection cable neatly along the trim.

A) DMS camera connection cable
Step 5. Connect the DMS Camera Power Cable #
- Use the DMS hardwiring power cable(2p) to connect the DMS camera to the vehicle’s fuse box.
(For full details, see Step 8 in the standard hardwiring guide.)
Step 6. Tuck in the DMS Hardwiring Power Cable #
- Use the pry tool to conceal the DMS camera hardwiring cable under trim or molding.

A) DMS camera Hardwiring cable
B) DMS camera connection cable
C) Front camera Power cord cable
Step 7. Plug in the Cigarette Lighter Power Cable #
- Connect the cigarette lighter power cable to both the socket and the front camera.
(For DR750X Plus and DR900X Plus models, skip this step and proceed with hardwiring.)
Step 8. Locate the Vehicle’s Fuse Box #
- Open the fuse panel and prepare to connect the hardwiring cables.
- If using a cigarette lighter power cable for the DMS camera, connect the 2-pin cigarette lighter cable into the vehicle socket.
💡 Fuse box location varies by vehicle model. Refer to your owner’s manual.


