Using a mobile Wi-Fi hotspot, BlackVue connectivity module device, or a car-embedded wireless internet connection you can connect your dashcam to the internet and take advantage of the following features in the BlackVue app and BlackVue Cloud Viewer:
Live View – Watch your dashcam’s live video feed.
Push notifications – Be notified on your smartphone when something happens to your car.
GPS tracking – See in real-time where your car is and track your car’s route and speed.
Two-way voice communication – Initiate voice chat from your smartphone to your dashcam.
Video backup – Backup video recordings to the Cloud or your smartphone’s storage.
Video playback – Watch recorded videos stored on your dashcam or in the Cloud on your smartphone anywhere, anytime.
Connect to BlackVue Cloud #
If you don’t have a mobile Wi-Fi hotspot, BlackVue connectivity module, or if you don’t want to use the BlackVue Cloud service, you can skip this step.
If you have a mobile Wi-Fi hotspot (also known as a portable Wi-Fi router), BlackVue connectivity module (CM100LTE), or a car-embedded wireless internet network or a Wi-Fi network near your car, you can use the BlackVue app to connect to BlackVue Cloud and see in real-time where your car is and the dashcam’s live video feed.
For more information about using the BlackVue app, please refer to the manual from www.blackvue.com > Support > Manuals.
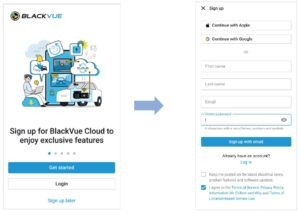
1. Create an account
(i) Open the BlackVue app.
(ii) Select Login if you have an account, otherwise tap Get started to create an account. If you want to sign up later, press Sign up later.
(iii) During sign up, you will receive an e-mail with a confirmation code. Enter the confirmation code to finish creating your account.
(iv) Tap Yes to enable push notifications (this setting can be adjusted at any time later).
(v) Once sign-up process is done, you will be automatically logged into your account.
2-1. Add BlackVue dashcam to camera list via Seamless pairing
(i) Select Connect to camera in the main page.
(ii) Make sure smartphone’s Bluetooth is turned on and press +.
(iii) Select Seamless pairing support model.
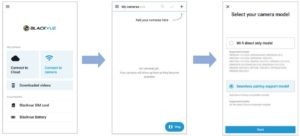
(iv) Choose your BlackVue dashcam from the detected camera list.
(v) Put your hand on the camera’s touch/proximity sensor to complete Seamless pairing.

![]() Note
Note
• Bluetooth lets you connect your smartphone to your dashcam within a range of 10m.
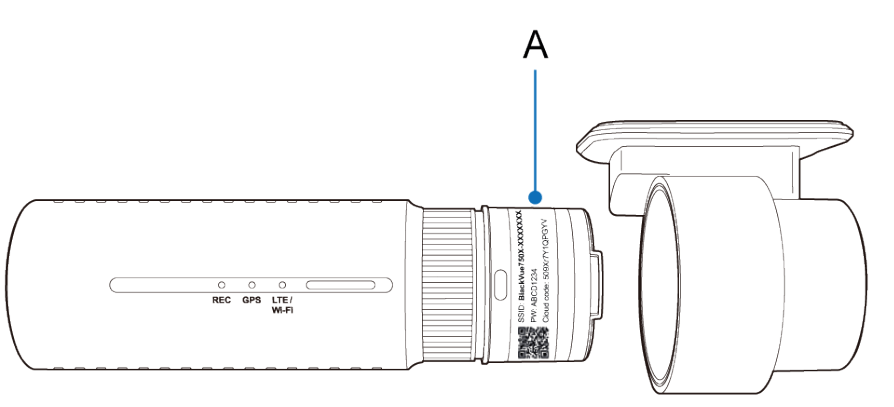
• You can find your BlackVue dashcam’s SSID in product label or in the packing box.
(vi) Customize your camera name and press OK.

(vii) BlackVue dashcam is now added to the camera list.
2-2. Register your camera manually using one of the following methods (Check connectivity details).
A) QR code / Cloud code / Serial number
(i) Scan the QR code: Scan QR Code and line up the QR Code on your smartphone screen.
(ii) Input QR code manually: Enter your camera’s Serial number, Cloud code and press Add camera.

Activate the SIM card #
To use the BlackVue Cloud service, SIM card must be activated for internet access via LTE network.
For full details, refer to the SIM activation guide that is included in the package.
SIM activation process #
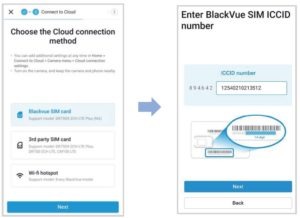
3-1. Activate BlackVue SIM card (BlackVue SIM package only)
(i) Insert the BlackVue SIM card.
(ii) After your camera is added, the app will give you the option to choose a cloud connection method.
(iii) Select BlackVue SIM card.
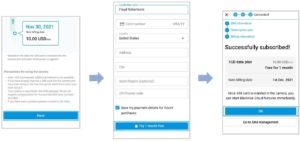
(iv) Input ICCID number (14 digits on your BlackVue SIM card) and press Next.
(v) Check your free trial Information and precautions, press Next.
(vi) Input billing information and press Try 1 month free.
(vii) BlackVue SIM card subscription is done. Check your data plan and billing date and press OK.
 Once SIM card is inserted in the camera, SIM card will be activated automatically.
![]() Note
Note
• For full details, please refer to the SIM Activation Guide in the package, Or visit BlackVue website: http://www.blackvue.com > Helpcenter > Sim Activation Guide (LTE Series).
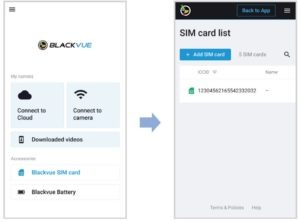
• If you want to manage your billing information, press Go to SIM management.
Go to BlackVue SIM card in the main home to manage your BlackVue SIM card.
3-2. Activate 3rd party SIM card
(i) Select 3rd party SIM card in the Choose the Cloud connection method page.
(ii) In order to set APN automatically, click ![]() icon to get the network carrier list. If you select your network carrier, APN setting information will auto-fill in the SIM card activation page.
icon to get the network carrier list. If you select your network carrier, APN setting information will auto-fill in the SIM card activation page.
(iii) If there is no network carrier that you want to use in the network carrier page, please select “Other network carrier”. You can manually set APN by filling in the APN information.
(iv) Configure the APN settings to activate the SIM card and press Done.
Once your dashcam is connected to LTE network, you can go to the Connect to Cloud menu to use the Cloud features.
![]() Note
Note
• SIM card activation during parking mode may require 20 seconds to retrieving SIM information.
Once the settings are saved, the dashcam should connect to Cloud within few seconds. If dashcam fails to connect to Cloud, please check the APN settings or contact customer support.
Now you can go to BlackVue app > Cloud and start using Cloud service features such as Remote Live View and Video Playback, Real-time Location, Auto-upload, Remote Firmware Update, and etc.
For detailed information regarding BlackVue Cloud Service, please visit our homepage (www.blackvue.com).
![]() Note
Note
• Incorrect APN setting or non-suggested carrier’s APN setting may lead to failure to connect to LTE network.
• If the SIM card is PIN or PUK locked, the app would show as following.
Your SIM card package includes the PIN code and PUK code. Enter the PIN code or PUK code as provided and press Next to continue.
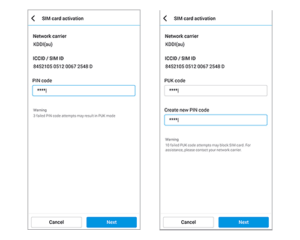
WARNING:
• Three consecutive incorrect password attempts may engage PUK mode.
• Ten consecutive incorrect PUK code attempts may block SIM card. If you require assistance, please contact the network carrier.
• To use the BlackVue Cloud Service, SIM card must be properly activated for Internet access via LTE network or third-party Wi-Fi
mobile hotspot.
• Some Cloud features may not work when surrounding temperature in high and/or LTE speed is slow.
Setup is complete. Your dashcam will automatically establish internet connection. If internet connection was not established, please ensure Wi-Fi information was inserted correctly.
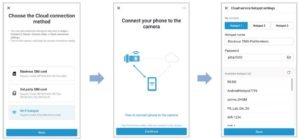
4. Connect your BlackVue dashcam to a Wi-Fi hotspot for Cloud connectivity
Click here for a step-by-step video tutorial, or go to the main menu and select Help > Video tutorials.
(i) Make sure your BlackVue dashcam and mobile Wi-Fi hotspot are on.
(ii) “Pair” your smartphone with the BlackVue dashcam via direct Wi-Fi. (for details see “Opening video files“).
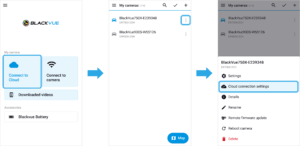
(iii) Open the BlackVue app. Select Connect to Cloud >  > Cloud connection settings.
(iv) Select Wi-Fi hotspot and connect to your phone to the camera.
(v) Choose your Wi-Fi hotspot from the list Enter the password and tap Save.
![]() Note
Note
• Up to 3 Wi-Fi hotspot SSIDs can be saved (e.g. home, portable hotspot and work).
• The BlackVue DR750X-2CH LTE Plus dashcam is not compatible with 5GHz wireless networks.
• To add or make changes to your cloud connection methods, go to Connect to Cloud, tap next to your dashcam model and select Cloud connection settings.
After saving the changes, your dashcam will automatically connect to the Wi-Fi hotspot. If internet connection was not established, please ensure Wi-Fi login credentials were inserted correctly.
Select Connect to Cloud from the main screen to access all of the BlackVue features.
![]() Note
Note
• You can also change the dashcam settings through Cloud by tapping next to your camera name and select Camera settings.
• If LTE and Wi-Fi hotspot are available for internet connection, Wi-Fi hotspot will be in priority. If LTE connection is preferred at all times, please remove Wi-Fi hotspot information.
• For more information about using the BlackVue app, please refer to the manual by going to the main menu and selecting Help > App manual.


