- Main box Installation
- SOS Button Installation
- SOS button pairing
- Changing SOS Button Battery
- Front camera installation
- Rear camera installation
- Rear IR camera installation
- Rear truck camera installation
- GNSS Module installation and pairing
- Blackvue Connectivity Module (CM100GLTE) installation (optional)
- Cigarette lighter power cable installation
- Hardwiring for Main Unit
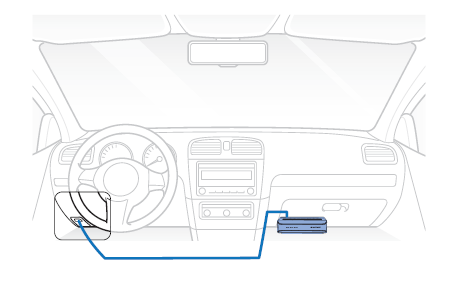
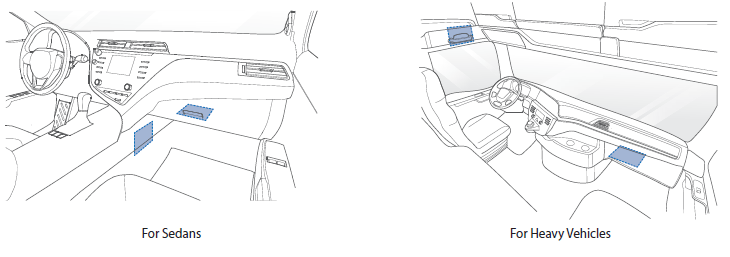
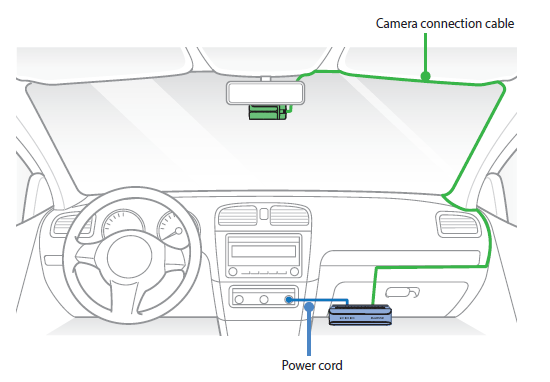
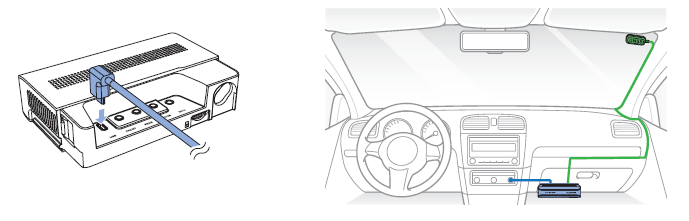
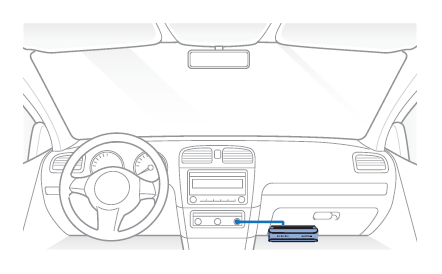
Main box Installation #
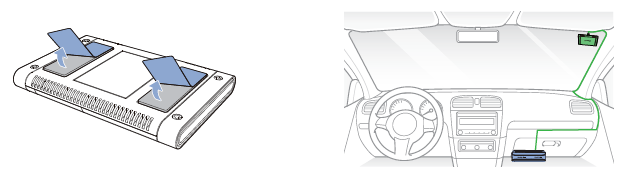
Install the main unit (box) on the side of center console or inside the glove box.For the heavy duty vehicles, the box can also be installed on the luggage shelf.
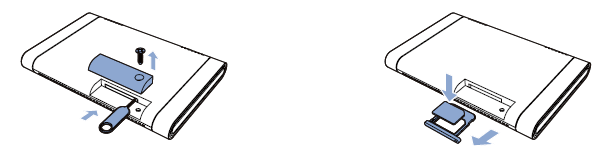
Insert the key in the box, rotate it counterclockwise and open the lock on the main unit. Take out the lock case and insert the micro SD card.

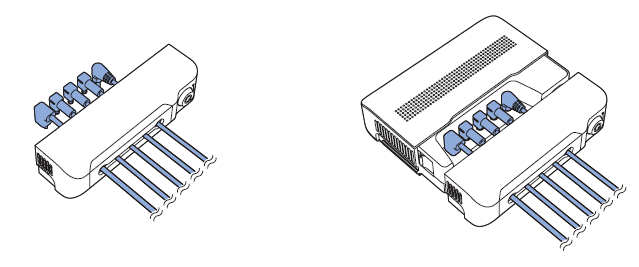
Insert the cables into the cable cover and connect them to their respective ports.Fix the cover on the main unit and lock it.

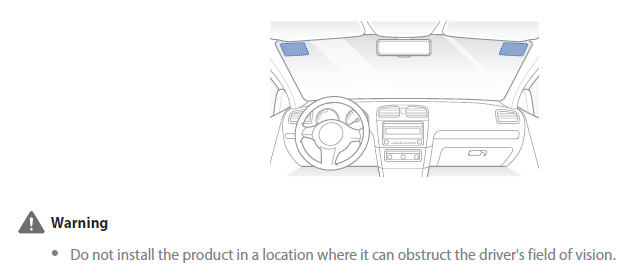
Warning
The front camera cable must be connected to the “Front” port. Connecting it to rear camera port will give a warning beep sound.
The “Rear” and “Optional” cables can be interchangeably connected. However the File output name will Start from “R” in case of Rear and “O” in case of Optional.
SOS Button Installation #
SoS button comes with a coin size magnet attached to it. It can be installed on a metal surface with the magnet.
SOS button can also be attached to any surface in your vehicle with a double sided tape, which comes in the accessory box included in the package.
Make sure that the SOS button can be installed where it’s in your arm’s reach and can be easily accessed.
SOS button pairing #
SOS button can be paired in two ways.
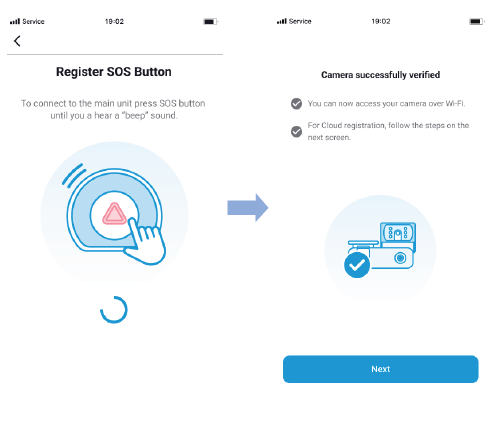
1. In the blackvue app, tap on Camera, choose Seamless Pairing models and select “DR770X Box“.
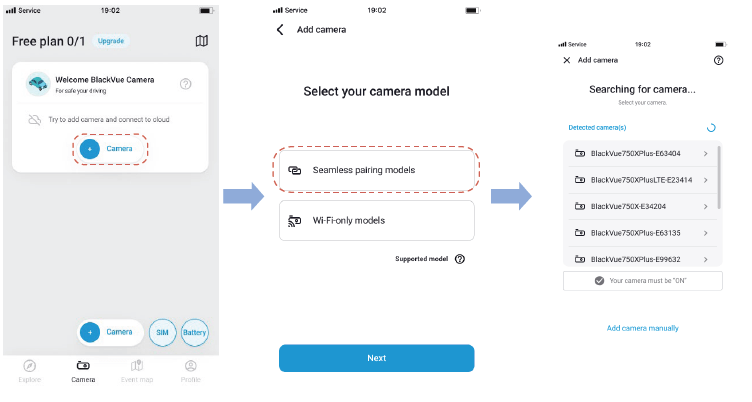
To connect to the main unit press SOS button until you a hear a “beep” sound. Your dashcam will also be verified on the app with this step.
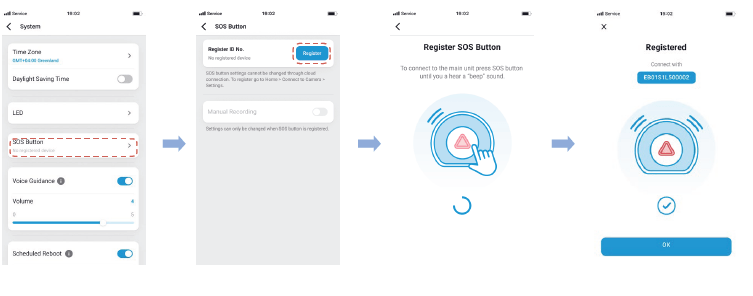
2. In the Blackvue App go to “Camera Settings” by tapping on three dots and choose “System settings”
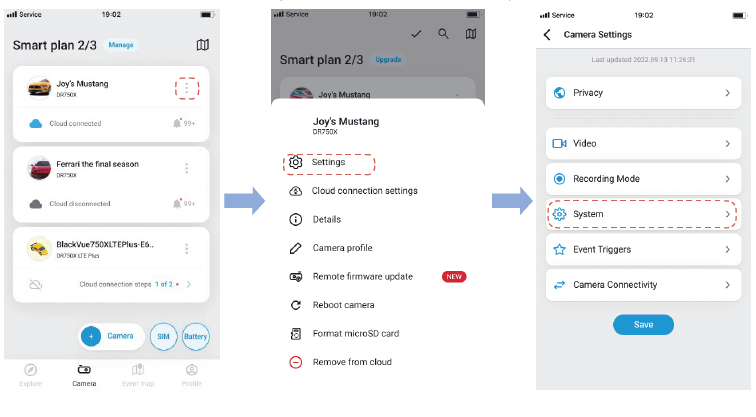
Choose “SOS Button” and tap on “Register”. To connect to the main unit press SOS button until you a hear a “beep” sound.
Changing SOS Button Battery #
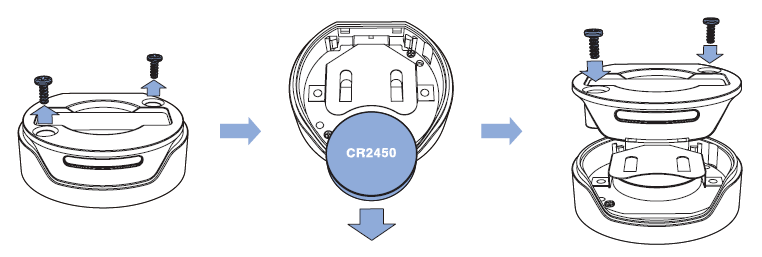
STEP1. Unscrew the back panel of the SOS Button
STEP 2. Remove the battery and replace it with a new CR2450 type coin battery.
STEP 3 Close and re-screw the back panel of the SOS button.
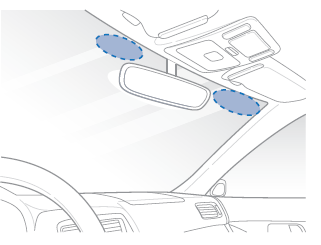
Front camera installation #
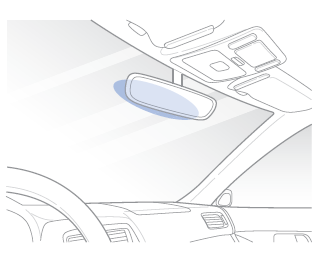
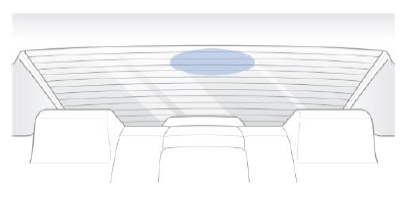
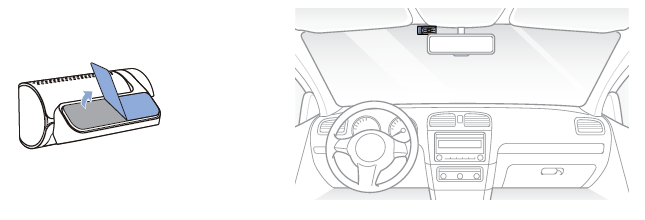
Install the front camera behind the rear view mirror. Remove any foreign matter and clean and dry the windshield before installation.
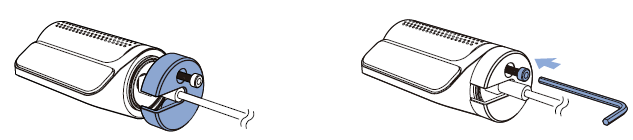
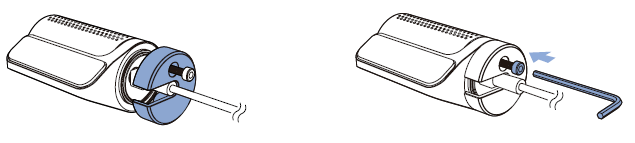
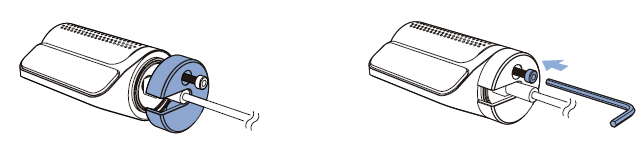
A. Detach the tamperproof bracket from the front camera by rotating the screw counterclockwise with the allen wrench.
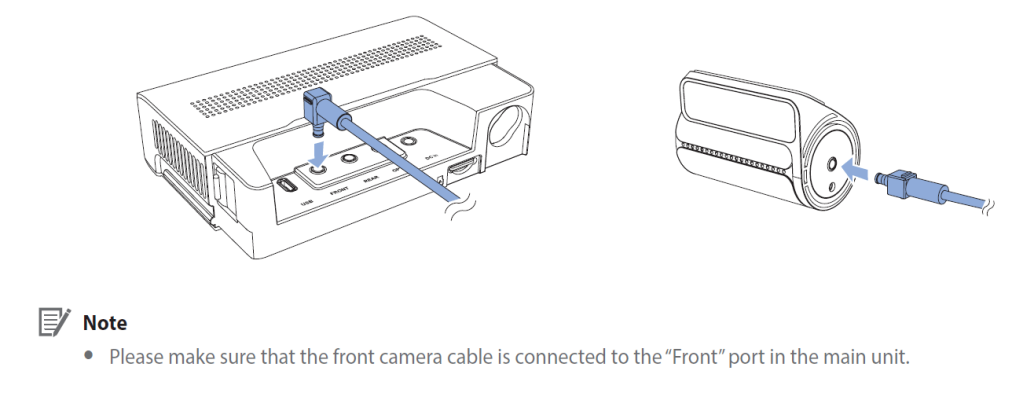
B. Connect the front camera (‘Rear’ port) and the main unit (‘Front’) using the rear camera connection cable.
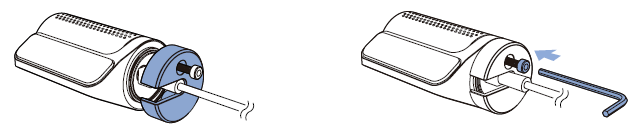
C. Align the tamperproof bracket with the mount bracket. Use the Allen wrench to tighten the screw. Do not fully tighten the screw as this could be done after attaching the camera to the front windshield.
D. Peel off the protective film from the double-sided tape and attach the front camera to the windshield behind the rear-view mirror.

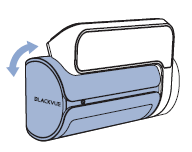
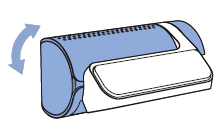
E. Adjust the angle of the lens by rotating the body of the front camera.
We recommend pointing the lens slightly downwards (≈ 10° below horizontal), so as to record video with a 6:4 road to background ratio. Tighten the screw fully.
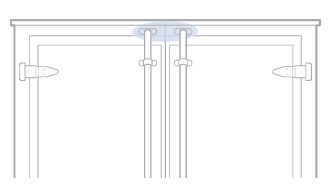
F. Use the pry tool to lift the edges of the rubber window sealing and/or molding and tuck in the front camera connection cable.
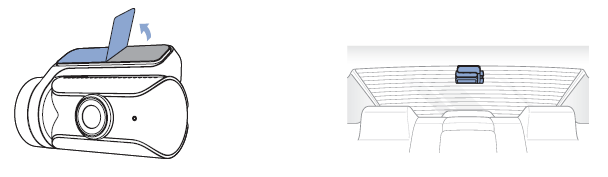
Rear camera installation #
Install the rear camera at the top of the back windshield. Remove any foreign matter and clean and dry the windshield before installation.
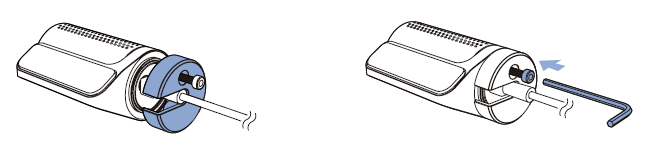
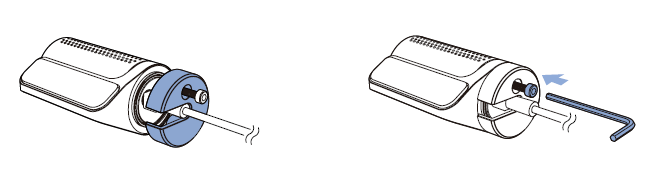
A. Detach the tamperproof bracket from the rear camera by rotating the screw counterclockwise with the Allen wrench.
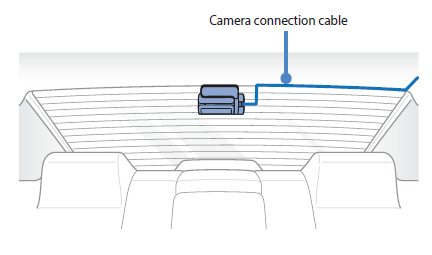
B. Connect the rear camera (‘Rear’ port) and the main unit (‘Rear’) using the rear camera connection cable.

C. Align the tamperproof bracket with the mount bracket. Use the Allen wrench to tighten the screw. Do not fully tighten the screw as this should be done after attaching the camera to the rear windshield.
D. Peel off the protective film from the double-sided tape and attach the rear camera to the rear windshield.
E. Adjust the angle of the lens by rotating the body of the front camera.
We recommend pointing the lens slightly downwards (≈ 10° below horizontal), so as to record video with a 6:4 road to background ratio. Tighten the screw fully.

F. Use the pry tool to lift the edges of the rubber window sealing and/or molding and tuck in the rear camera connection cable.
Rear IR camera installation #
Install the rear IR camera at the top of the front windshield. Remove any foreign matter and clean and dry the windshield before installation.
A. Detach the tamperproof bracket from the rear IR camera by rotating the screw counterclockwise with the Allen wrench.
B. Connect the rear IR camera (‘Rear’ port) and main unit (“Option”) using the rear camera connection cable.

C. Align the tamperproof bracket with the mount bracket. Use the Allen wrench to tighten the screw. Do not fully tighten the screw as this should be done after attaching the camera to the rear windshield.
D. Peel off the protective film from the double-sided tape and attach the rear IR camera to the front windshield.
E. Adjust the angle of the lens by rotating the body of the rear IR camera.
F. Use the pry tool to lift the edges of the rubber window sealing and/or molding and tuck in the rear IR camera connection cable.

Rear truck camera installation #
Install the rear camera externally at the top of the back of the truck.
A. Fasten the rear camera mounting bracket using the included screws to the top of the back of the vehicle.
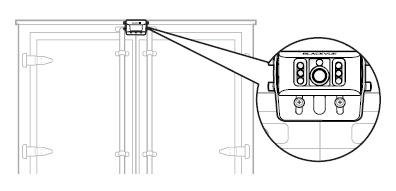
B. Connect the Main box (Rear or Option Port) and the rear camera (“V out”) using the rear camera waterproof connection cable.

GNSS Module installation and pairing #
A. Connect the GNSS Module to the box and attach it to the edge of the window.
B. Insert the cables into the cable cover and connect them to the USB socket.
Blackvue Connectivity Module (CM100GLTE) installation (optional) #
Install the connectivity module at top corner of the windshield. Remove any foreign matter and clean and dry the windshield before installation.
A. Turn off the engine.
B. Unscrew the bolt that locks the SIM slot cover on connectivity module. Remove the cover, and unmount the SIM slot using the SIM eject tool. Insert the SIM card into the slot.
C. Peel off the protective film from the double-sided tape and attach the connectivity module to the top corner of the windshield.
D. Connect the main box (USB port) and the connectivity module cable (USB).
E. Use the pry tool to lift the edges of the windshield trim/molding and tuck in the connectivity module cable.
Note
SIM card must be activated to use LTE service. For details, refer to the SIM Activation Guide.
Cigarette lighter power cable installation #
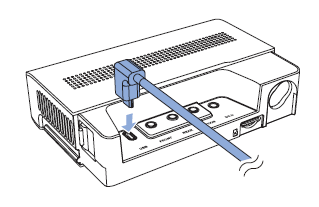
A. Plug the cigarette lighter power cable into the cigarette lighter socket of your car and the main unit.
B. Use the pry tool to lift the edges of the center console and tuck in the power cord.
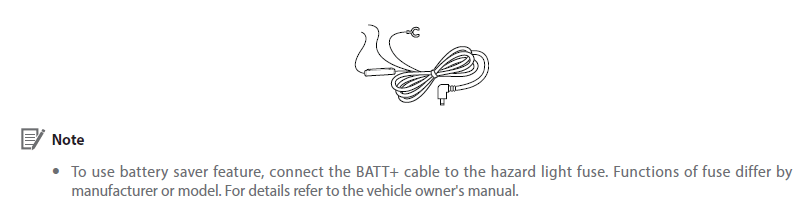
Hardwiring for Main Unit #
A Hardwiring Power Cable uses the automotive battery to power your dashcam when the engine is off. A low voltage power cut-off function and a parking mode timer to protect the automotive battery from discharge is installed in the device. Settings can be changed in the BlackVue App or Viewer.
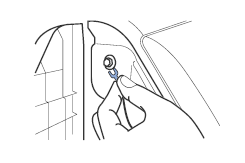
A. To do the hardwiring, first locate the fuse box to connect the hardwiring power cable.
Note
Location of the fuse box differ by manufacturer or model. For details, refer to the vehicle owner’s manual.
B. After removing fuse panel cover, find a fuse that powers on when engine is turned on (ex. cigarette lighter socket, audio, etc) and another fuse that remains powered on after the engine is turned off (ex. hazard light, interior light). Connect the ACC+ cable to a fuse that powers on after engine start, and BATT+ cable to a fuse that remains powered on after engine is turned off.
C. Connect the GND cable to metal ground bolt.
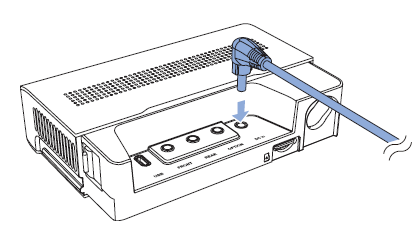
D. Connect the power cable to the DC in terminal of the main unit. BlackVue will power up and start recording. Video files are stored on the microSD card.
Note
When you run the dashcam for the first time the firmware is automatically loaded onto the microSD card. After the firmware has been loaded onto the microSD card you can customize settings using the BlackVue app on a smartphone or BlackVue Viewer on a computer.
E. Use the pry tool to lift the edges of the center console and tuck in the hardwiring power cable.