Install the front camera behind the rear view mirror. Install the DMS camera on the driver’s dashboard or front windshield.
Remove any foreign matter and clean and dry the installation area before setup.

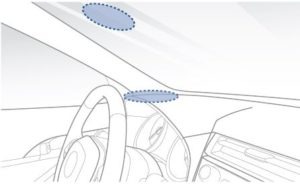
A B
A) Front camera
B) DMS camera
Warning
- Do not install the product in a location where it can obstruct the driver’s field of vision.
- Be careful not to interfere with the product when operating the vehicle handle.
1.Turn off the engine. Open the cover of the microSD card slot, gently push the card into the slot until it locks into place and close the cover.

2. Peel off the protective film from the double-sided tape and attach the front camera to the windshield behind the rear-view mirror.

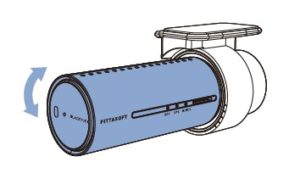
3. Adjust the angle of the lens by rotating the body of the front camera. We recommend pointing the lens slightly downwards (≈10° below horizontal), so as to record video with a 6:4 road to background ratio.
Note
• Recorded videos from DMS are saved to the microSD card on the front dashcam.
• For 750X DMS LTE Plus users, please insert the SIM card following QSG that’s including in the box.
4. Adjust the angle of the lens by rotating body of DMS and mounting bracket and peel off the double-sided tape.

A B
A) Dashboard installation
B) Windshield installation
5. Attach the DMS camera to the windshield or dashboard.

A B
A) Windshield installation
B) Dashboard installation
Note
• For best accuracy of DMS, install the DMS camera in the recommended area.
6. Connect the front camera (‘Rear’ port) and the DMS camera (‘V out’) using the DMS camera connection cable.

7. Use the pry tool to lift the edges of the rubber window sealing and molding and tuck in the DMS camera connection cable.

A) DMS camera connection cable
8. Connect the DMS camera (DC in) using DMS camera hardwiring cable (2p) to a car fuse, For details, Skip to 11 for DMS Hardwiring power cable setup.
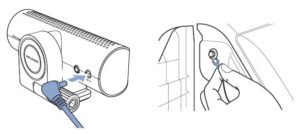
9. Use the pry tool to lift the edges of the rubber window sealing and or molding and tuck in the DMS camera Hardwiring power cable.

A) DMS camkera Hardwiring cable
B) DMS camera connection cable
C) Front camera Power cord cable
10. Plug the cigarette lighter power cable into the cigarette lighter socket and the front camera. Skip to 11 for Hardwiring Power Cable setup (DR750X Plus, DR900X Plus only).
11. Locate the fuse box to connect the hardwiring power cable.
Note
- Location of the fuse box differ by manufacturer or model. For details, refer to the vehicle owner’s manual.
- If you want to use cigarette lighter power cable for DMS camera, plug the cigarette lighter power cable (2p) into cigarette socket.
11-1. After removing fuse panel cover, find a fuse that powers on when engine is turned on (ex. cigarette lighter socket, audio, etc) and another fuse that remains powered on after the engine is turned off (ex. hazard light, interior light). Connect the ACC+ cable to a fuse that powers on after engine start (Front camera hardwiring cable (3p)) and BATT+ cable to a fuse that remains powered on after engine is turned off (Front camera hardwiring cable (3p) + DMS camera hardwiring cable (2p)).
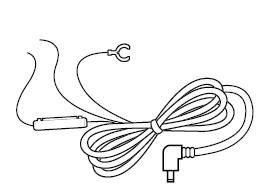

A B
A) Front camera hardwiring cable (3p)
B) DMS camera hardwiring cable (2p)
11-2. Connect the GND cable to metal ground bolt (Front camera hardwiring cable (3p) + DMS camera hardwiring cable (2p)).
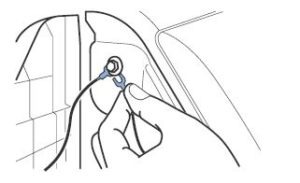
12.Connect the power cable to the DC in terminal of the front and DMS cameras. BlackVue will power up and start recoring. Video files are stored on the microSD card.
Note
• When you run the dashcam for the first time the firmware is automatically loaded onto the microSD card. After the firmware has been loaded onto the microSD card you can customize settings using BlackVue Viewer on a computer.
• To record in parking mode while the engine is off, connect the Hardwiring Power Cable (included in the box) or install a Power Magic Battery Pack (sold separately). A Hardwiring Power cable uses the automotive battery to power your dashcam when the engine is off. A low voltage power cut-off function and a parking mode timer to protect the automotive battery from discharge is installed in the device. Settings can be changed in the BlackVue App or Viewer


