Using a mobile Wi-Fi hotspot, BlackVue connectivity module device, or a car-embedded wireless internet connection you can connect your dashcam to the internet and take advantage of the following features in the BlackVue app and BlackVue Cloud Viewer:
Live View – Watch your dashcam’s live video feed.
Push notifications – Be notified on your smartphone when something happens to your car.
GPS tracking – See in real-time where your car is and track your car’s route and speed.
Two-way voice communication – Initiate voice chat from your smartphone to your dashcam.
Video backup – Backup video recordings to the Cloud or your smartphone’s storage.
Video playback – Watch recorded videos stored on your dashcam or in the Cloud on your smartphone anywhere, anytime.
Connect to BlackVue Cloud (Optional) #
If you don’t have a mobile Wi-Fi hotspot, BlackVue connectivity module, or if you don’t want to use the BlackVue Cloud service, you can skip this step.
If you have a mobile Wi-Fi hotspot (also known as a portable Wi-Fi router), BlackVue connectivity module (CM100LTE), or a car-embedded wireless internet network or a Wi-Fi network near your car, you can use the BlackVue app to connect to BlackVue Cloud and see in real-time where your car is and the dashcam’s live video feed.
For more information about using the BlackVue app, please download the BlackVue app Manual from www.blackvue.com > Support > Downloads.
1. Create an account
(i) Open the BlackVue app.
(ii) Tap the button in the top-left corner and select Create account.
(iii) Enter your name, e-mail address and choose a password. Re-enter your password and press Sign up.
(iv) You will receive an e-mail. Click the link in the email to finish creating your account.
2. Register your dashcam with your account
(i) In the BlackVue app select Cloud and login to your account.
(ii) Tap Yes to enable push notifications (this setting can be adjusted at any time later).
(iii) Select Register new camera.
(iv) Register your camera using one of the following methods:
QR Code: Press Scan QR Code and line up the QR Code on your smartphone’s screen.

A) QR code / Cloud code / Serial number
or
Manual registration: Enter your camera’s Serial number and Cloud code and press Register.
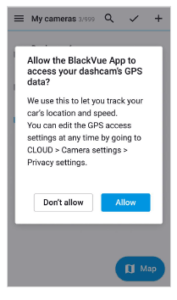
(v) The app will ask for your permission to access your dashcam’s GPS data. If you allow access the app will be able to show you your dashcam’s location and speed. If you don’t allow access you won’t be able to see your dashcam’s location and speed (you can allow access later in Privacy settings).

3. Connect your BlackVue dashcam to a Wi-Fi hotspot for Cloud connectivity
Click here for a step-by-step video tutorial, or go to the main menu and select Help > Video tutorials.
(i) Make sure your BlackVue dashcam and mobile Wi-Fi hotspot are on.
(ii) “Pair” your smartphone with the BlackVue dashcam via Wi-Fi direct (for details see “Opening video files“).
(iii) Open the BlackVue app. Select Wi-Fi > > Firmware settings > Cloud settings.

(iv) Ensure Enable Cloud service is on. Select Cloud service hotspot settings.
(v) Choose your Wi-Fi hotspot from the list and enter the password. Tap 2 and 3 to add settings for additional hotspots. Once done, tap OK.

Note
• Up to 3 Wi-Fi hotspot SSIDs can be saved (e.g. home, portable hotspot and work).
(vi) Go back to the Firmware settings menu, tap and tap Save and close.

After rebooting, your dashcam will automatically connect to the Wi-Fi hotspot. If internet connection was not established, please ensure Wi-Fi login credentials were inserted correctly.
Select Cloud from the main screen to access all of the BlackVue features.
Note
• You can also change the dashcam settings through Cloud by tapping next to your camera name and select Camera settings.
• If LTE and Wi-Fi hotspot are available for internet connection, Wi-Fi hotspot will be in priority. If LTE connection is preferred at all times, please remove Wi-Fi hotspot information.
• For more information about using the BlackVue app, please refer to the manual by going to the main menu and selecting Help > App manual.
4. Connect your BlackVue dashcam to Cloud connectivity (Using CM100LTE)
Make sure your BlackVue dashcam and connectivity module is connected. Then, follow the below steps for SIM registration.
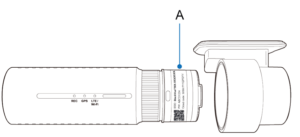
(i) Locate the SIM card slot. Unscrew the bolt that locks the SIM slot cover. Then, unmount the SIM slot by using a SIM eject tool.
Insert SIM in the SIM slot. Mount the SIM slot back in the connectivity module, then, screw the bolt to hold SIM slot cover.
(ii) “Pair” your smartphone with the BlackVue dashcam via Wi-Fi Direct.
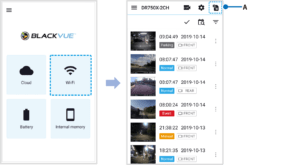
(iii) Open the BlackVue app and select Wi-Fi > .

A) SIM card activation
(iv) Configure the APN settings to activate the SIM card. For detailed information, please check “SIM activation guide” in the packaging box or visit BlackVue Help Center: www.helpcenter.blackvue.com -> LTE connectivity guide.
(v) Once your dashcam is connected to the internet, you can go to the CLOUD menu to use BlackVue Cloud features.
Note
• For full details, refer to the “SIM Activation Guide” that is included in the CM100LTE package.
• To use the BlackVue Cloud Service, SIM card must be properly activated for Internet access via LTE network.
• When the dashcam is connected to internet, you can use BlackVue Cloud features such as remote Live View and Video playback, Real-time location, push notification, Auto-upload, remote Firmware update etc. on BlackVue app and BlackVue Viewer.
• Some Cloud features may not work when surrounding temperature is high or/and LTE speed is slow.
• For more information about using the BlackVue app, please download the Cloud Manual from www.blackvue.com > Support > Downloads.


