Install the front camera behind the rear view mirror. Install the interior/rear camera at the top of the front or back windshield. Remove any foreign matter and clean and dry the windshield before installation.

![]() Note
Note
• Make sure to peel the protective film off the front and rear camera. The cameras could be damaged from overhearing if the protective film is not removed.
![]() Warning
Warning
Do not install the product in a location where it can obstruct the driver’s field of vision.
1.Turn off the engine. Open the cover of the microSD card slot, gently push the card into the slot until it locks into place and close the cover.

2. Peel off the protective film from the double-sided tape and attach the front camera to the windshield behind the rear-view mirror.

3. Adjust the angle of the lens by rotating the body of the front camera. We recommend pointing the lens slightly downwards (≈10° below horizontal), so as to record video with a 6:4 road to background ratio.

4. Peel off the protective film from the double-sided tape and attach the interior/rear camera to the front or rear windshield. Adjust the angle of the lens by rotating the body of the camera.

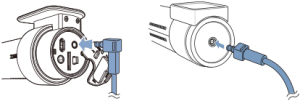
5. Connect the front camera (‘Rear’ port) and the rear camera (‘V out’) using the rear camera connection cable.
6. Use the pry tool to lift the edges of the rubber window sealing and molding and tuck in the interior/rear camera connection cable.
7. Connectivity Module (Optional): Connect the connectivity module to the front camera and attach it to the edge of the window. Use the pry tool to tuck in the cable.
8. Plug the cigarette lighter power cable into the cigarette lighter socket and the front camera. Skip to 12 for Hardwiring Power Cable setup.
9. Use the pry tool to lift the edges of the windshield trim/molding and tuck in the power cord. 
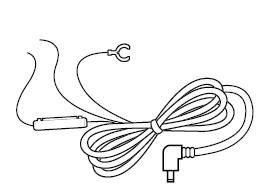
A) Interior/rear camera connection cable
B) Power cord
10. Turn on the engine. The BlackVue dashcam will power up and start recording. Video files are stored on the microSD card. When the microSD card fills up, the newest video files will start to replace the oldest video files (called loop recording) – so you will always have the most recent video files.
11. Turn off the engine. The dashcam will automatically stop recording and power down. To record in parking mode while the engine is off please connect the Hardwiring Power Cable (included in the box) or install a Power Magic Battery Pack (sold separately). A Hardwiring Power Cable uses the automotive battery to power your dashcam when the engine is off. A low voltage power cutoff function and a parking mode timer to protect the automotive battery from discharge is installed in the device. Settings can be changed in the BlackVue App or Viewer.
12. Locate the fuse box to connect the hardwiring power cable.
![]() Note
Note
• Location of the fuse box differ by manufacturer or model. For details, refer to the vehicle owner’s manual.
12-1. After removing fuse panel cover, find a fuse that powers on when engine is turned on (ex.cigarette lighter socket, audio, etc) and another fuse that remains powered on after the engine is turned off (ex.hazard light, interior light). Connect the ACC+ cable to a fuse that powers on after engine start, and BATT+ cable to a fuse that remains powered on after engine is turned off..
![]() Note
Note
• To use battery saver feature, connect the BATT+ cable to the hazard light fuse. Functions of fuse differ by manufacturer or model. For details, refer to the vehicle owner’s manual.
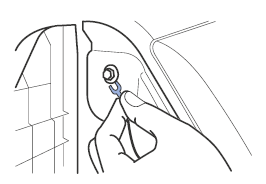
12-2. Connect the GND cable to metal ground bolt.
13. Connect the power cable to the DC in terminal of the front camera. BlackVue will power up and start recording. Video files are stored on the microSD card.
![]() Note
Note
• Up to 50 event recordings (impact, manual) can be locked from being overwritten. By default, this feature is enabled. In the firmware settings, you can choose to either overwrite them with new event files when the event file storage is full or lock the 50 event files and save the new event files in loop recording storage. Please note that formatting the microSD card deletes all the recordings including the locked event files.
• The recording LED is on while recording (default setting) and the GPS LED is on when a GPS signal is received. There are 4 recording modes: Normal, Event, Parking and Manual. The dashcam starts recording in normal mode, switches to event mode when an impact is detected, and switches to parking mode when the vehicle is turned off (Hardwiring power cable, ACC+) or stationary for 5 minutes (Cigarette lighter power cable, G-sensor). Touching the proximity sensor turns on/off audio recording or triggers manual recording depending on the firmware settings.
• When you run the dashcam for the first time the firmware is automatically loaded onto the microSD card. After the firmware has been loaded onto the microSD card you can customize settings using BlackVue Viewer on a computer.


