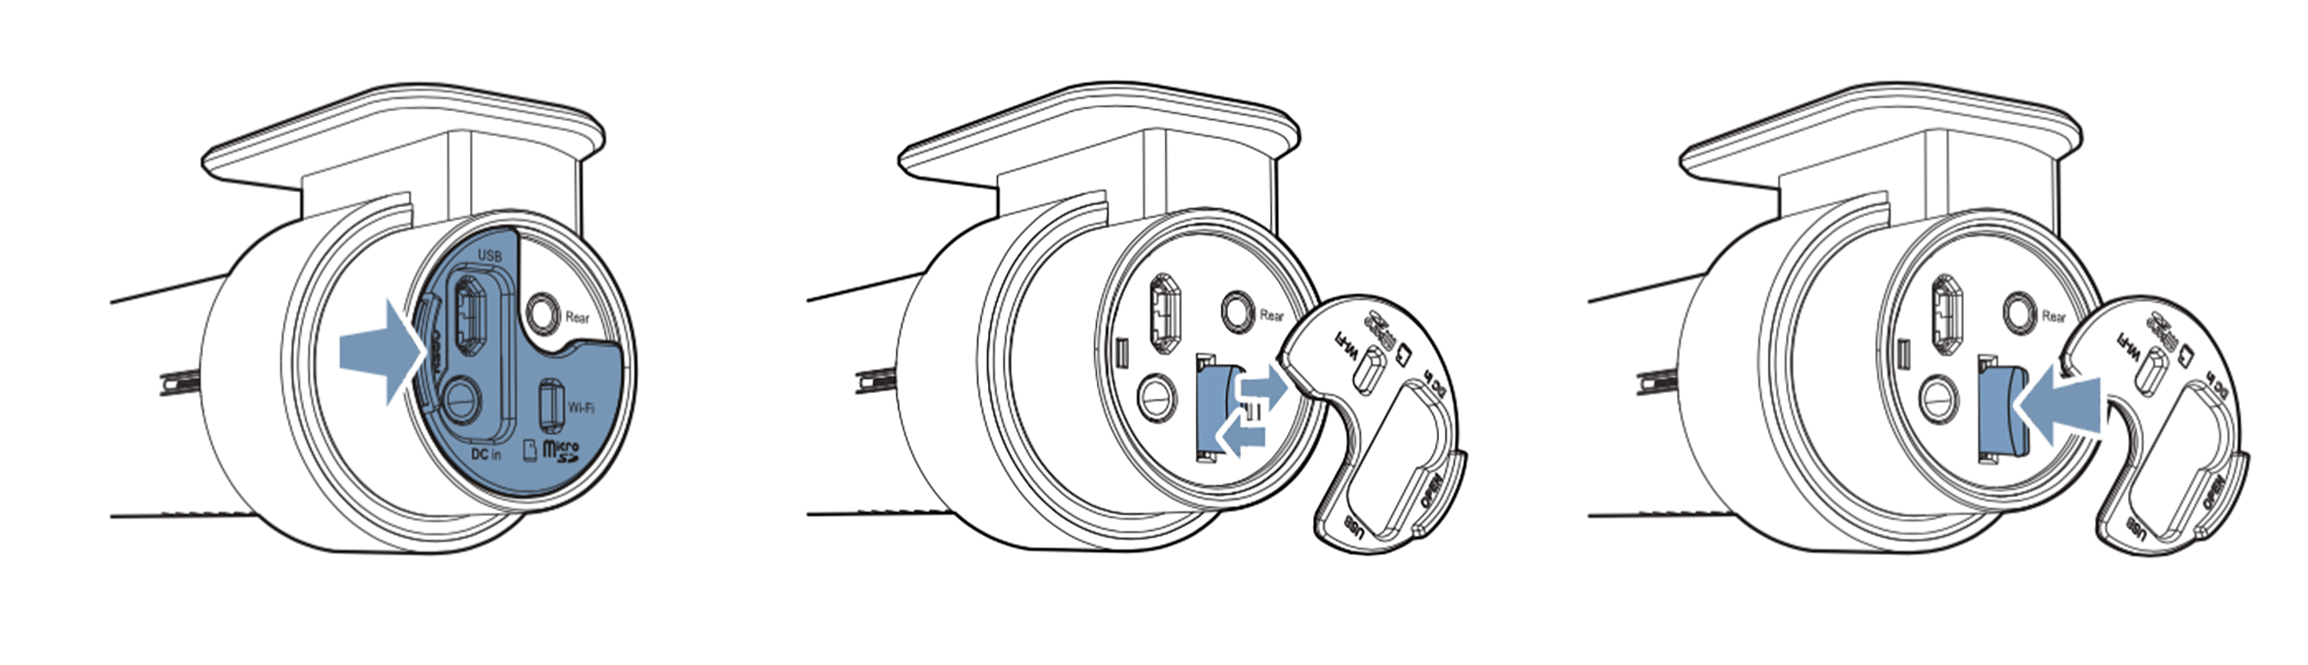
Removing the microSD card #
1. Unplug the power cord to turn off the dashcam.
2. Open the cover of the microSD card slot.
3. To remove the microSD card, gently press on the card to release the lock then carefully pull the card out.
To insert the microSD card, gently push the card into the slot until it locks into place and close the cover.
Opening video files in BlackVue Viewer #
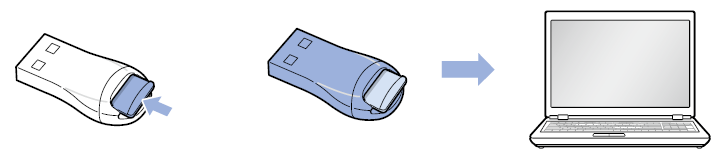
1. Remove the microSD card from the dashcam.
2. Insert the card into the microSD card reader and connect it to a computer.
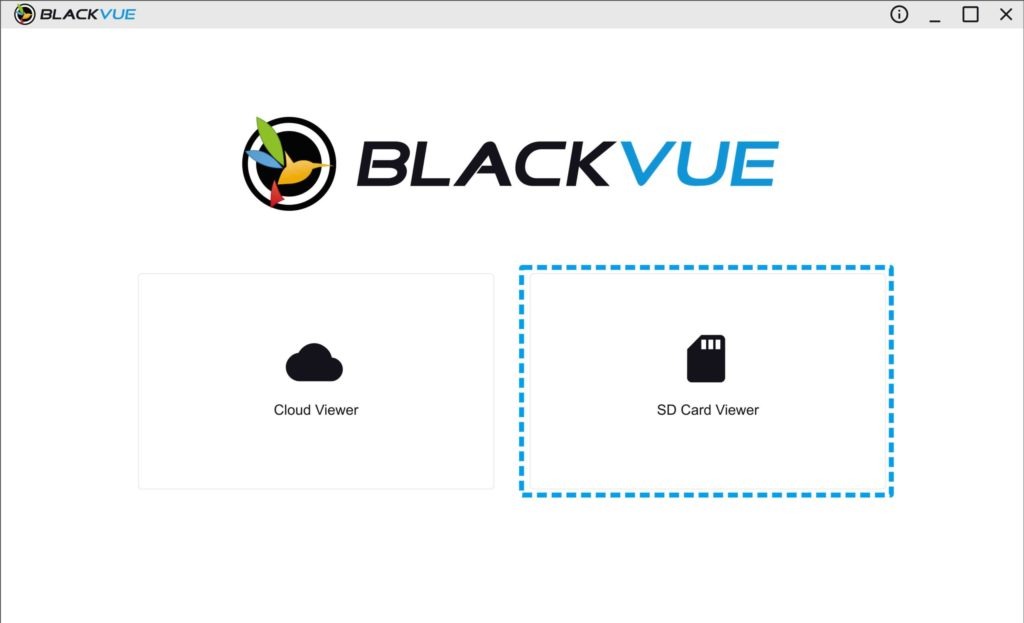
3. Download BlackVue Viewer from www.blackvue.com > Support > Downloads and install it on your computer.
4. Run BlackVue Viewer. Select SD Card Viewer in the launcher page. Then Select SD Card Viewer in the launcher page.
5. To play, select a video and click on the play button or double click the selected video.
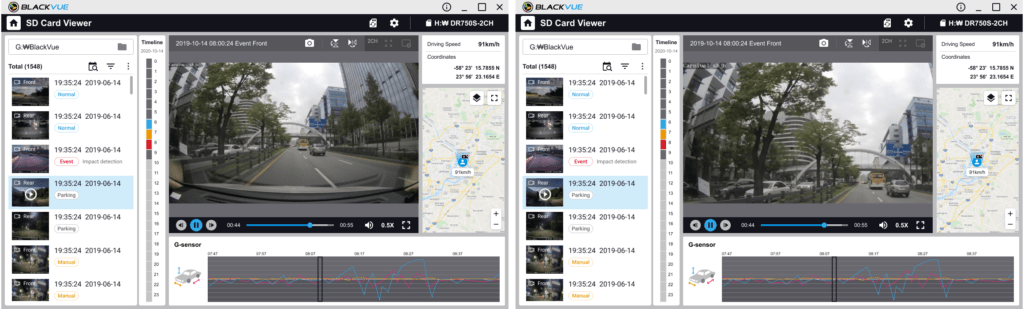
Viewer screen composition (Windows/macOS) #
When you execute the program, a launcher window will be shown. You can choose either SD Card Viewer or Cloud Viewer. To go back to the launcher screen, click the ![]() button.
button.

A) Back to launcher page
B) Select the folder
C) Recorded file list
D) Timeline for hour selection
E) G-Sensor information
F) Map screen
G) GPS data
H) Select SD card
I) Settings
J) Format micro SD card
K) Playback screen
L) File type Filter
M) Date Filter
![]() Note
Note
• All images shown are for illustration purpose only. Actual app may differ from images shown.
Playing back videos #
In BlackVue Viewer double click a video file to play.
BlackVue Viewer shows by default the files in the microSD card. To see files in another folder click the button  and browse to the folder.
Identify video files by recording type #
To filter the video files, press  . Use the
 ![]() buttons to filter the video list by recording type. The
buttons to filter the video list by recording type. The ![]() filter button displays both E (Event) and I (Impact event while parked) recordings.
filter button displays both E (Event) and I (Impact event while parked) recordings.
| |
Normal | The dashcam records in normal mode by default. |
| |
Event | When the dashcam detects an impact while in normal or parking mode, it switches to event mode and saves an event recording beginning 5 seconds before the event trigger. Exceeding the set speed limit will also trigger an event recording. |
| |
Parking | In parking mode the dashcam continuously buffers video. When motion is detected in the dashcam’s field of view, it saves a parking recording beginning 5 seconds before the motion detection. |
| |
Manual | If proximity sensor is set as a manual recording trigger in the firmware settings, touching or waving a finger within 20 mm of the sensor will turn on manual recording. |
![]() Note
Note
• The dashcam requires a constant power source to record in parking mode. See “Optional accessories” for more information.
Checking the displayed time #
The time the video was recorded is displayed in the lower left corner of the video in the playback screen. If the displayed time in the recorded videos is incorrect please see “Time settings”
Using BlackVue Viewer #

A) File name
B) Capture image (paused)
C) Flip vertically
D) Flip horizontally
E) Expand second camera view
F) Close second camera view
G) View full screen
H) Playback speed control
I) Volume control
J) Playback time
K) Next frame
L) Play/pause
M) Previous frame
Exploring the timeline and G-Sensor graph #
You can check the impact sensitivity (G-Sensor) information in the line graph.
 A) G-Sensor information
Zoom options #
• Use the mouse scroll wheel zoom. Right clicking will restore the video to the default size.
• You can resize the playback frame or the BlackVue Viewer window by dragging the borders.
• Full-screen view: Double click on the video image to enter full-screen view. Double click again or tap ESC to return to the default view.
Checking the GPS data #
You can check the GPS data of the recorded video in BlackVue Viewer while video is playing back. The driving speed and coordinates are displayed above the map frame.
![]() Note
Note
• If you do not want to record GPS data, you can turn off GPS location recording at Viewer’s Settings > Basic > Recording.

Managing videos #
You can manage the recorded videos through the BlackVue Viewer program. You can also format the microSD card.
![]() Note
Note
• If the microSD card is full, by default the dashcam will record over the oldest videos first.
Capturing or printing a still image from video #
1. Double click a file in the file list to play.
2. Click the ![]() pause button to pause the video.
pause button to pause the video.
3. Select the ![]() capture button to capture the image.
capture button to capture the image.
Deleting videos #
1. Move the cursor on a video you want to delete. Right-click the mouse button and press Delete.
2. Click Delete.
• To delete multiple files at once, click and select Delete. Select the video files or click the checkbox at the top of the video list to select all files then press Delete.
Exporting videos #
1. Move the cursor on a video you want to export and right-click the mouse button.
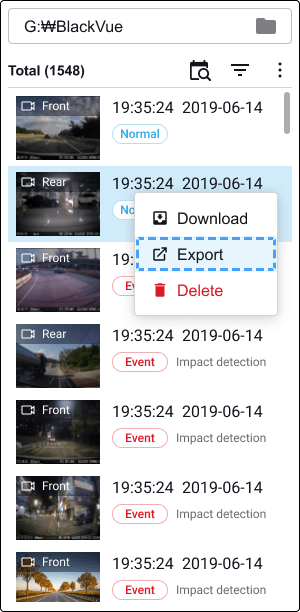
2. Click Export.
3. If you want to extract a segment of a file, edit the start and end second points from Select segment. To export without audio select Sound Off.

4. Click the Export button.
5. Select the folder in which to save the file and enter the file name.
6. Click the Save button.
Copying videos #
1. Move the cursor on a video you want to download and right-click the mouse button.
2. Click Download.
3. Select the folder in which to copy the file and enter the file name.
4. Click the Select folder button.
• To copy multiple files at once clickand select Download. Select the video files or click the checkbox at the top of the video list to select all files then press Download. Choose a directory and press Download.
• When copying files the segment adjustment and sound off tools are not available.


